Some segmented turners use a computer program to design their bowls. I dont do this because I dont want to know beforehand what the bowl is going to look like, and any little mistakes I make I can kid myself it was a happy accident and meant to be.
To help me cut the segments for the rings I designed a Set of Printable Charts.
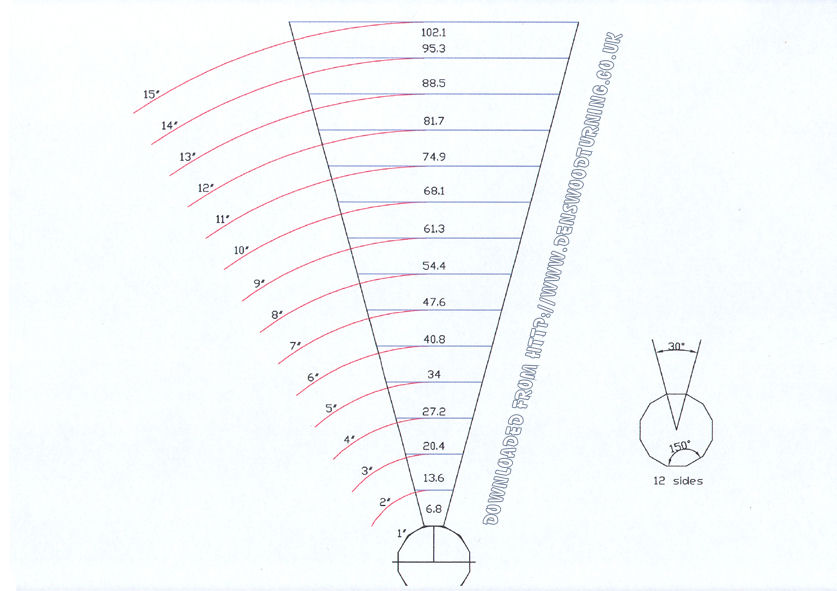
To start with decide how many pieces you want per circle. (For this example I will use the size
12)
You will see via the segment calculator that you have a wedge of 30 degrees, which equates to a cut of 15 degrees. These charts show on the left hand side the diameter of the ring that you wish to make.
Take a 10 inch diameter and you will see that you need a segment length of 68.1 millimetres and 12 segments will give you your 10 inch circle.
If you want a finished bowl of 10 inches I would advise you to add at least 5mm to the length of each segment. Have fun and enjoy.
This picture shows a 20mm thick and 40mm wide piece of oak with a 3mm thick piece of mahogany glued to it, which will be a feature ring. This is where I normally start from and then work up and down from that.
This picture shows the wood cut into segments, and by cutting one angle with mahogany uppermost and then flipping the wood over you can now see the oak.
In this picture it shows the sequence of oak, mahogany, oak etc. I then take some of the 3mm thick mahogany and cut it to 23mm wide to insert between the segments, which will then give you a step pattern of Mahogany.
This shows 10 of the mahogany pieces glued in place. The remaining 2 to be inserted after the 2 halves of the circle are squared up and connected together.
In this picture you can see a jig I made up which enables me to clamp the half circles and cut at the correct angle. This takes up any idiosyncrasies in the 2 halves of the circle. I then insert my 2 remaining mahogany inserts and glue the ring together.
This picture shows the oak segments with mahogany insert pieces ready to be glued. In this bowl there are 2 such rings.
This shows a dry fit ring, which I always do before gluing up.
This picture shows a preturned base dry fitted to the rest of the segmented rings. When I am satisfied that everything is in alignment I then hot glue scraps of wood to keep it where it is, and then I number each ring. I then disassemble the rings and glue together making sure they all go back together in the right order. The blocks of scrap wood stop any movement whilst in the press drying.
The bowl is now ready to be turned, and with the aid of a pair of pliers I remove the blocks of scrap wood.
Picture of the internal view of finished bowl.
Picture of the external view of finished bowl.


